Step 1 - Removal of the retaining peg


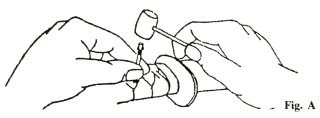
The peg is normally located approximately 1 1/2″ form the hand guard and between the lacing crossover. To remove it, simply place a small dirt punch, (brass only), on the small end of the retaining peg, a sharp tap should dislodge it. (Figure A)
Step 2 - Removal of handle

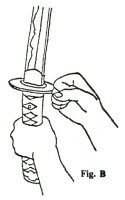
After the removal of the retaining peg has been accomplished, one should grasp the handle with the left hand, (as illustrated). Holding the sword in an upright (point up) position. with the cutting edge away from the body, strike the left wrist area with the right hand. This should loosen the handle and enable it to be easily removed.
Step 3

If the above fails proceed as indicated in Figure C, utilizing a wooden hammer and block, (plastic or Nylon is also accepted), be very careful not to place the drive block on the hand guard itself, it should rest on the spacer. Never use a metal hammer or place the blade in a vice, this will in all probability ruin your sword. (An expensive lesson)
Step 4

Now that the handle has been removed, proceed with the removal of the hand guard and collar (figure D). They slide off in the same direction as did the handle.
Step 5


Take digital images of the blade and tang area (whether you see an inscription or not).
Step 6 - Make rubbing of the inscription on the tang
How to make rubbing without our pressure sensitive paper:
Pressure-sensitive paper method
We no longer provide pressure-sensitive paper. This paper is very costly so we ask if you please provide us with digital images.
Photographic method
You can use a camera and photograph the NAKAGO (tang of the sword). If you need to add contrast to the characters try rubbing some white chalk into the characters and then photograph. You will have to adjust the light so that the signature is visible. When you are finished remove the chalk with a dry toothbrush. Do not disturb the rust on the NAKAGO. The black and red rust help identify the age of the blade.
Carbon paper method
In this method you use carbon paper, typing paper and a dowel. Place the carbon paper on the sword’s nakago (tang) carbon-side up, then place the typing paper on top. Round the end of the dowel. Use the rounded end of the dowel to gently rub on the paper. Remove handle, wipe signature (inscription) area of tang clean with a towel or cloth. Rub carbon paper firmly and evenly over tang apply scratch tape (Wide) to tang, smooth out wrinkles. Remove tape and apply to plain white piece of paper.
Ink stone method
In this method you use a black ink stone rubbed on a piece of rice paper. The rice (mulberry) paper can be found in many bookstores that carry Japanese books or art stores that carry a variety of papers in the US. Place the sword flat and securely on a table (Weight down with heavy book). On top of the nakago (tang) place the rice paper. Use the inkstone to gently rub on top of the paper. The impressions of the signature will show up on the paper as light spaces surrounded by ink. You can try rubbing a pencil (such as a carpenter’s pencil) on top of a sheet of typing paper. This works but not as well.
Smoking and tape method
In this method you use the soot from a candle, Scotch Magic tape, and white typing paper. Light the candle and let it burn until you have a nice long flame. Wrap the sword blade in a towel or chamois. While holding the sword blade wrapped in chamois or cloth, and above the candle, pass the very top of the candle (the coolest part of the flame) across the signature to soot the area. Take care to not heat up the blade. The blade should never get hot enough so that you cannot hold onto the tang without burning yourself. After sooting the signature, put the sword flat and securely on the table. Take off a strip of Scotch Magic tape and careful place on tang. For most tangs you will need to overlap the tape two or three times. After the tape is in place on the tang, rub the top of the tape with your fingertip to make the characters show up. Them remove the tape and place on a piece of white paper.
When you are finished, remove the soot first with a dry cloth or tissue. Next wash the tang with a mild soap and rinse. Dry the tang and then remove the cloth on the blade and oil and uchiko the blade. Do not disturb the rust on the nakago. The black and red rust help identify the age of the blade.
*For safety reasons, always weight down blade with a heavy book.
If you have questions whatsoever in regards to the instructions on step 6 or anything else, please contact us @ 1-608-315-0083 any time or via e-mail.
Pictures and content may not be copied without the express permission of samuraisword.com ©
